
![]()
SVN服务实战应用指南
svn
- SVN服务实战应用指南一、什么是SVN(subversion)?
- 二、SVN与git的区别
- 三、SVN版本系统逻辑架构原理图
- 四、安装配置SVN服务客户端的操作此处就不介绍了,我们可以通过在服务器上使用svn co svn://127.0.0.1/test 进行测试
一、什么是SVN(subversion)?
SVN是近年来崛起的非常优秀的版本管理工具,与CVS管理工具一样,SVN是一个固态的跨平台的开源的版本控制系统。SVN版本管理工具管理者随时间改变的各种数据。这些数据放置在一个中央资料档案库(repository)中,这个档案库很像一个普通的文件服务器或者FTP服务器,但是,与其他服务器不同的是,SVN会备份并记录每个文件每一次的修改更新变动。这样我们就可以把任意一个时间点的档案恢复到想要的某一个旧的版本,当然也可以直接浏览指定的更新历史记录。
为什么会有SVN这样一个项目?
官方解释:为了接管CVS的用户基础,确切的说,我们写了一个新的版本控制系统,它和CVS很相似,但是它修正了以前CVS所没有解决的许多问题。
SVN时一个非常通用的软件系统,它常被用来管理程序 源码,但是他也可以管理任何类似的文件,如文本、视频,图片等等。
SVN相关站点:
Subversion官网:
http://subversion.tigris.org/
http://subversion.apache.org/

svn客户端:http://tortoisesvn.net/
svn中文网站:http://www.iusesvn.com/
中文常见问题解答:FQA:http://subversion.apache.org/faq.zh.html
官方手册:http://svnbook.red-bean.com/
二、SVN与git的区别
1.SVN集中式版本控制系统
SVN版本控制系统时集中式的数据管理,存在一个中央版本库,所有开发人员本地开发所使用的代码都是来自于这个版本库,提交了代码也都必须提交到这个中央版本库。
SVN版本控制系统工作流程如下:
- 1.在中央库上创建或从主干复制一个分支。
- 2. 从中央库check out下这个分支的代码。
- 3. 增加自己的代码文件,修改现存的代码或删除代码文件。
- 4. Commit代码。假设有人在刚刚的分支上提交了代码,你就会被提示代码过期。
- 你得先up你的代码后再提交。Up代码的时候如果出现冲突,需要解决冲突后再进行提交
缺点:
- 当无法连接到中央版本库的环境下,你无法提交代码,将代码加入版本控制;
- 你无法查看代码的历史版本以及版本的变化过程。提交到版本控制系统中的代码我们都默认通过自测可运行的,如果某个模块的代码比较复杂,不能短时间内实现可测试的功能,那么你需要等很长的时间才能提交自己的代码,由于代码库集中管理,因为,需要对中央版本库的存储做备份。这点分布式的版本控制系统要好一些。Svn的备份要备份所有代码数据以及所有更改的版本记录。
2.git分布式版本控制
Git是由Linus开发的,所以很自然的git个Linux文件系统结合的比较紧密,以至于在Windows上你必须使用cygwin才能使其完美工作。
那git凭什么叫做分布式的版本控制系统呢?还是从模式讲起。
Git中没有了中央版本库的说法了,但是为了开发小组的代码共享,从某种程度上说本地的仓库和远程的仓库在身份上是等价的,没有主从之分。
如果你的项目是闭源项目,或者你习惯于以往的集中式的管理模式的的话,那么在git下你也可以像SVN那么工作,知识流程中可能增加一些步骤。
- 1.你本地创建一个git库,并将其add到远程git库中
- 2. 你在本地添加或者删除文件,然互commit。当然commit操作都是提交到本地的git库中了(其实是提交到git目录下的object目录中去了)
- 3.将本地git库的分支push到远程git库的分支,如果这个时候远程git库中已经有别人push过,那么远程git库将不允许你push,这个时候你需要先pull,然后如果有冲突,处理好冲突,commit到本地git库后,再push到远程git库。
3.运维人员掌握版本管理
对于版本管理系统,运维人员需要掌握的技术点:
- 1.安装,部署,维护,故障。
- 2.简单的使用,很多公司都是由开发来管理,包括建立账户和添加删除账号。
- 3.对于版本控制系统,运维人员相当于开发商,开发人员是业主,运维搭建的系统为开发人员服务。
4.Svn服务端运行方式
svn服务常见的运行访问方式有3种:
1、独立服务器
访问地址如:svn://svn.etiantian.org/sadoc);

2、借助apache等http服务
访问地址如:http://svn.etiantian.org/sadoc);
       a.单独安装apache+svn(不要用)。
       b.CSVN(apache+svn)是一个单独的整合的软件,带web界面管理的SVN软件

3、本地直接访问(例如:file:///root/svndata/sadoc)
5.SVN客户端访问方式
SVN客户端可以通过多种方式访问服务器,例如:本地磁盘访问,或者各种各样不同的网络协议访问,但一个版本库地址永远都是URL,URL反映了访问方法。
访问方式 说明 file:// 直接通过本地磁盘或者网络磁盘访问版本库 http:// 通过WebDAV协议访问支持Subersion的Apache服务器 https:// 与http://相似,但是使用SSL加密访问 svn:// 通过TCP/IP自定义协议访问svnserver服务器 svn+ssh:// 通过认证并加密的TCP/IP自定义协议访问svnserver服务器 三、SVN版本系统逻辑架构原理图
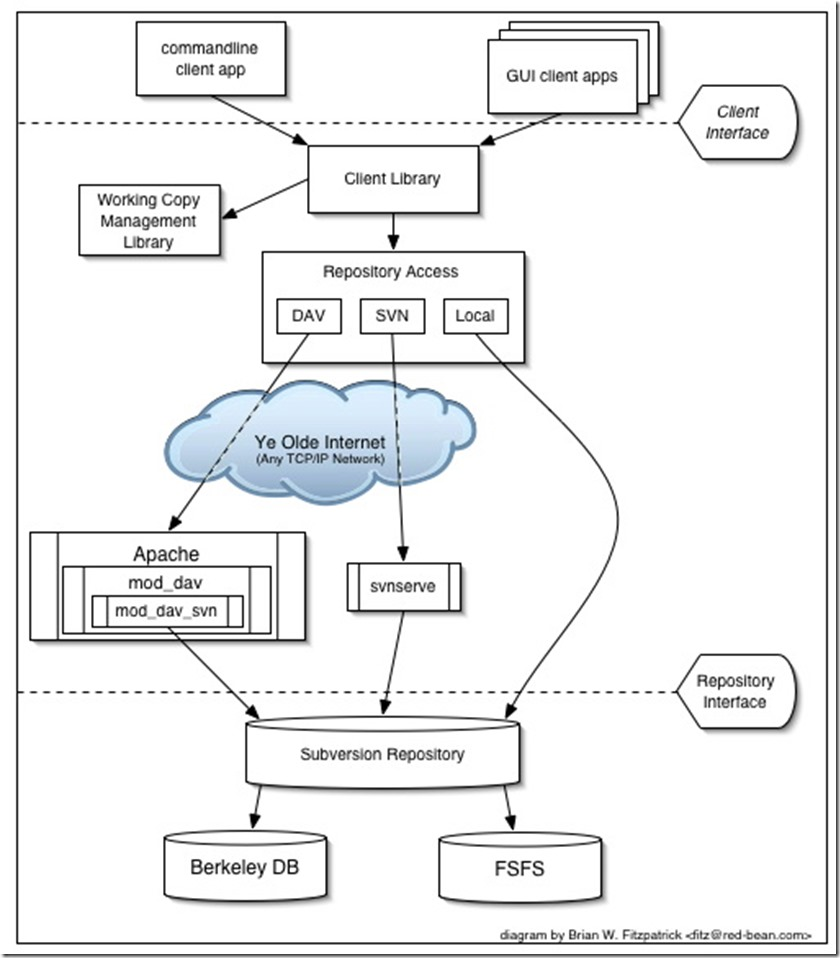
四、安装配置SVN服务
1.环境准备
[root@tomcat ~]# cat /etc/redhat-release
CentOS release 6.5 (Final)
[root@tomcat ~]# uname -r
2.6.32-431.el6.x86_64
[root@tomcat ~]# /etc/init.d/iptables stop
[root@tomcat ~]# wget -O /etc/yum.repos.d/CentOS-Base.repo http://mirrors.aliyun.com/repo/Centos-6.repo
[root@tomcat ~]# wget -O /etc/yum.repos.d/epel.repo http://mirrors.aliyun.com/repo/epel-6.repo
[root@tomcat ~]# yum clean all && yum makecache
2.安装SVN
[root@tomcat ~]# rpm -qa subversion
subversion-1.6.11-15.el6_7.x86_64
如果没有上面的结果,则需要执行如下命令安装
[root@tomcat ~]# yum install subversion -y
[root@tomcat ~]# rpm -qa subversion
subversion-1.6.11-15.el6_7.x86_64
补充:yum安装rpm包安装后本地不清除的方法
[root@tomcat ~]# grep keepcache /etc/yum.conf
keepcache=1
3.配置并启动SVN
建立SVN版本库数据存储根目录(svndata)及用户,密码权限目录(svnpasswd)
[root@tomcat ~]# mkdir -p /home/svndata  数据存储根目录
[root@tomcat ~]# mkdir -p /home/svnpasswd 用户密码权限目录
启动SVN服务指定访问的SVN根目录
[root@tomcat ~]# svnserve -d -r /home/svndata/
可以查看svnserve命令帮助,了解相关启动参数:
[root@tomcat ~]# svnserve --help
usage: svnserve [-d | -i | -t | -X] [options]

Valid options:
  -d [--daemon]            : daemon mode
  -i [--inetd]             : inetd mode
  -t [--tunnel]            : tunnel mode
  -X [--listen-once]       : listen-once mode (useful for debugging)
  -r [--root] ARG          : root of directory to serve
  -R [--read-only]         : force read only, overriding repository config file
  --config-file ARG        : read configuration from file ARG
  --listen-port ARG        : listen port
                             [mode: daemon, listen-once]
  --listen-host ARG        : listen hostname or IP address
                             [mode: daemon, listen-once]
  -T [--threads]           : use threads instead of fork [mode: daemon]
  --foreground             : run in foreground (useful for debugging)
                             [mode: daemon]
  --log-file ARG           : svnserve log file
  --pid-file ARG           : write server process ID to file ARG
                             [mode: daemon, listen-once]
  --tunnel-user ARG        : tunnel username (default is current uid's name)
                             [mode: tunnel]
  -h [--help]              : display this help
  --version                : show program version information
查看SVN进程
[root@tomcat ~]# ps -ef |grep svn
root       3008      1  0 00:32 ?        00:00:00 svnserve -d -r /root/svndata/
root       3010   2919  0 00:32 pts/0    00:00:00 grep svn
检查SVN端口
[root@tomcat ~]# lsof -i :3690
COMMAND   PID USER   FD   TYPE DEVICE SIZE/OFF NODE NAME
svnserve 3008 root    3u  IPv4  53617      0t0  TCP *:svn (LISTEN)
[root@tomcat ~]# netstat -lntup|grep svn
[root@tomcat ~]# lsof -i tcp:3690
3.建立项目版本库
创建一个新的SVN项目test其实类似test这样的项目可以创建多个,每个项目对应不同的代码,这里只是以创建一个项目为例。
[root@tomcat ~]# svnadmin create /home/svndata/test
[root@tomcat ~]# tree /home/svndata/test/
/root/svndata/sadoc/
|-- README.txt
|-- conf
|   |-- authz
|   |-- passwd
|   `-- svnserve.conf
|-- db
|   |-- current
|   |-- format
|   |-- fs-type
|   |-- fsfs.conf
|   |-- min-unpacked-rev
|   |-- rep-cache.db
|   |-- revprops
|   |   `-- 0
|   |       `-- 0
|   |-- revs
|   |   `-- 0
|   |       `-- 0
|   |-- transactions
|   |-- txn-current
|   |-- txn-current-lock
|   |-- txn-protorevs
|   |-- uuid
|   `-- write-lock
|-- format
|-- hooks
|   |-- post-commit.tmpl
|   |-- post-lock.tmpl
|   |-- post-revprop-change.tmpl
|   |-- post-unlock.tmpl
|   |-- pre-commit.tmpl
|   |-- pre-lock.tmpl
|   |-- pre-revprop-change.tmpl
|   |-- pre-unlock.tmpl
|   `-- start-commit.tmpl
`-- locks
    |-- db-logs.lock
    `-- db.lock
10 directories, 28 files
4.调整SVN配置文件及权限
[root@tomcat ~]# cd /root/svndata/test/conf/
[root@tomcat conf]# ll
total 12
-rw-r--r-- 1 root root 1080 Feb 23 16:11 authz
-rw-r--r-- 1 root root  309 Feb 23 16:11 passwd
-rw-r--r-- 1 root root 2279 Feb 23 16:11 svnserve.conf
[root@tomcat conf]# cp svnserve.conf svnserve.conf,ori  操作前备份
[root@tomcat conf]# vim svnserve.conf
anon-access = none
auth-access = write
password-db = /home/svnpasswd/passwd
authz-db = /home/svnpasswd/authz   #为了方便统一管理我们把用户的权限和密码文件存放在一个目录下

配置解析:
anon-access= 定义非授权用户(匿名用户)的访问权限,有三种方式: none 、 read 、 write ,设置为 none 限制访问, read 为只读, write 为具有读写权限,默认为 read 。

auth-access= 定义授权用户的访问权限,有三种方式: none 、 read 、 write ,设置为 none 限制访问, read 为只读, write 为具有读写权限,默认为 write 。

password-db= 定义保存用户名和密码的文件名称,这里为 passwd ,和该文件位于同一目录。

authz-db= 定义保存授权信息的文件名称,这里为 authz ,和该文件位于同一目录。
把密码文件模板拷贝到相关目录
[root@tomcat conf]# cp passwd authz /home/svnpasswd/
[root@tomcat conf]# ll /home/svnpasswd/
total 8
-rw-r--r-- 1 root root 1080 Mar 31 00:51 authz
-rw-r--r-- 1 root root  309 Mar 31 00:51 passwd
因为SVN默认都是明文密码,为了安全起见加上权限
[root@tomcat conf]# cd /home/svnpasswd/
[root@tomcat svnpasswd]# chmod 700 *
[root@tomcat svnpasswd]# ll
total 8
-rwx------ 1 root root 1080 Mar 31 00:51 authz
-rwx------ 1 root root  309 Mar 31 00:51 passwd
5.创建SVN用户及设置权限
[1.创建用户]
[root@tomcat svnpasswd]# cat passwd
### This file is an example password file for svnserve.
### Its format is similar to that of svnserve.conf. As shown in the
### example below it contains one section labelled [users].
### The name and password for each user follow, one account per line.

[users]
cyh = 123456
test = 123..
itcast = 123456

[2.配置权限]
[root@tomcat svnpasswd]# cat authz
### This file is an example authorization file for svnserve.
### Its format is identical to that of mod_authz_svn authorization
### files.
### As shown below each section defines authorizations for the path and
### (optional) repository specified by the section name.
### The authorizations follow. An authorization line can refer to:
###  - a single user,
###  - a group of users defined in a special [groups] section,
###  - an alias defined in a special [aliases] section,
###  - all authenticated users, using the '$authenticated' token,
###  - only anonymous users, using the '$anonymous' token,
###  - anyone, using the '*' wildcard.
###
### A match can be inverted by prefixing the rule with '~'. Rules can
### grant read ('r') access, read-write ('rw') access, or no access
### ('').

[aliases]
# joe = /C=XZ/ST=Dessert/L=Snake City/O=Snake Oil, Ltd./OU=Research Institute/CN=Joe Average

[groups]
# harry_and_sally = harry,sally
# harry_sally_and_joe = harry,sally,&joe
[test:/]
cyh = rw
itcast = rw
test = rw
重启SVN命令
[root@tomcat svnpasswd]# svnserve -d -r /home/svndata/

